Porcelain Veneers installation systems
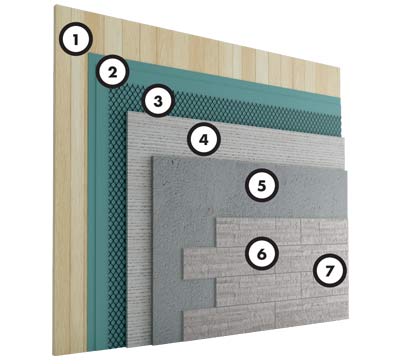
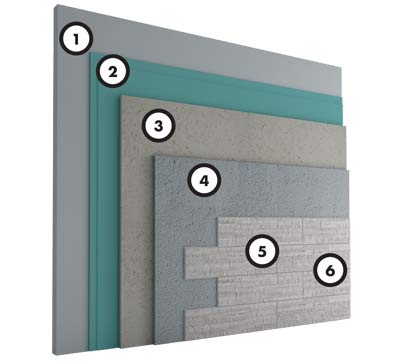
WOOD FRAME
- 1. Sheating;
- 2. Two layers of Water Resistive Barrier (WRB);
- 3. Metal lath;
- 4. Scratch coat;
- 5. Mortar setting bed;
- 6. Landmark’s porcelain veneers;
- 7. Grout joint.
CONCRETE MASONRY UNIT
- 1. Mortar applied directly to untreated unpainted masonry, concrete or stucco;
- 2. Landmark’s porcelain veneers;
- 3. Grout joints;
Note
Concrete Masonry Unit must be free from paint,
sealer and dirt. Dirty, painted, sealed and smooth
surfaces/walls will require additional preparation to
address these condition.

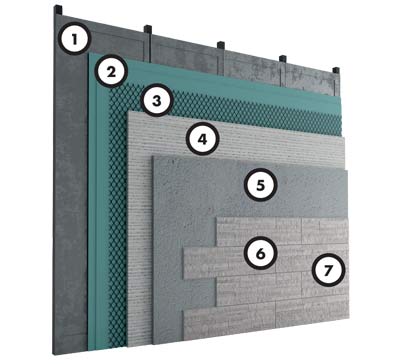
METAL FRAME
- 1. Sheating;
- 2. Two layers of water resistive barrier (WRB);
- 3. Metal lath;
- 4. Scratch coat;
- 5. Mortar setting bed;
- 6. Landmark’s porcelain veneers;
- 7. Grout joint.
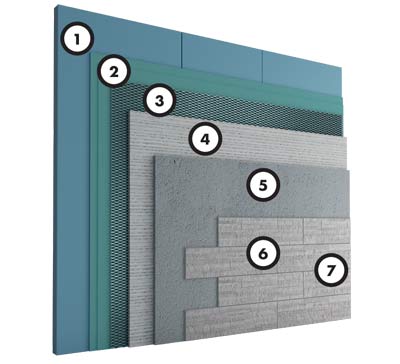
RIGID FOAM INSULATION
- 1. Rigid foam insulation;
- 2. Two layers of water resisitve barrier (WRB);
- 3. Galvanized metal lath;
- 4. Scratch coat;
- 5. Mortar setting bed;
- 6. Landmark’s porcelain veneers;
- 7. Grout joint.
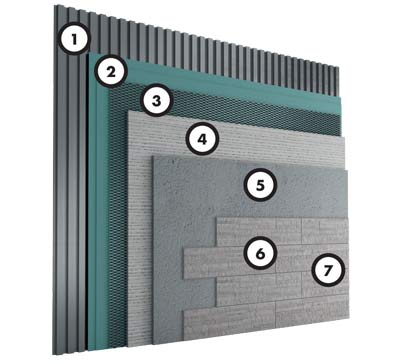
METAL BUILDING
- 1. Sheating;
- 2. Two layers of water resistive barrier (WRB);
- 3. Galvanized metal lath;
- 4. Scratch coat;
- 5. Mortar setting bed;
- 6. Landmark’s porcelain veneers;
- 7. Grout joint.
CEMENT BOARD
- 1. Sheating;
- 2. Two layers of water resistent barrier (WRB);
- 3. Cement board ;
- 4. Mortar setting bed;
- 5. Landmark’s porcelain veneers;
- 6. Grout joint.
STEP 1
PREPARING THE SURFACE
Verify that the surface on which Landmark’s porcelain veneers will be installed is solid and free of any materials that would prevent the porcelain veneer from bonding. Check also that the backup system is capable of supporting the weight of Landmark’s porcelain veneers.
The surfaces on which Landmark’s porcelain veneer will be applied must have a rough texture to ensure a good mortar bond. If necessary, attaching a lath and applying a scratch coat can bring the surface to a desirable level of roughness. Please note that, whenever a lath is utilized, a scratch coat is needed.
A scratch coat may not be needed over Cement Masonry Unit (CMU) and cement board. If the lath is installed, apply a ½ inch thick layer of mortar ensuring that the mortar completely covers the lath. Scratch the mortar horizontally to create a scratch coat that will help the porcelain veneer to adhere, not only chemically but also mechanically, to the surface.
Before starting the installation, ensure that the Water- Resistant Barrier (WRB) and flashing are correctly installed. It is worth noting that different elements and materials within a structure can react differently in response to temperature and moisture fluctuations or to different loads pressure. In cases where differential movements are expected, such as at the transition between a framed backup system to a concrete masonry unit system, movement joints (control joints and expansion joints) may be needed.
Movement joints must be specified by the architect or the engineer according to ASTM C 1063 control joints requirements. Do not cover the movement joints with Landmark’s porcelain veneers as this might lead to cracking.
STEP 2
ESTIMATING THE PORCELAIN VENEERS REQUIRED
Determine the amount of Landmark’s porcelain veneer products needed by calculating the area to be covered. Multiply the length by the height, the result will be the area of the surface to be covered. Subtract square footage for any space that will not be covered such as windows and doors. Measure the height of the corner walls and compute the linear feet of corners to determine the amount of corner pieces needed.
One linear foot of corner pieces covers approximately 2 square feet of surface. Subtract the area covered by the linear feet of corner pieces from the area required. It is suggested to order extra porcelain veneers to allow cutting, trimming and waste.
- Wall Area = Length × Height;
- Windows and doors areas = Windows and doors Width × Windows and doors Height ;
- Wall Area Covered by Corners = Lineal Feet of Corners Required × 2;
- Square feet required = Wall Area – Windows and doors Area − Wall Area Covered by Corners;
- It is recommended to request extra square feet.
STEP 3
PLANNING THE LAYOUT
It is recommended, in order to maintain a natural look, to
follow a stack bond pattern or a ¼ offset bond pattern or a
1/3 offset bond pattern when installing Landmark’s porcelain
veneers and keep the joints as small as possible.
Before starting the installation, lay out several pieces on a
flat surface to allow proper selection from a variety of sizes,
shapes and colors.
In case of a dry stacked installation, it is recommended that all interstice gaps between Landmark’s porcelain veneers are properly sealed with a specific grout for porcelain (please always refer to the grout manufacturer for further information). Also, it is recommended to comply with the building codes and federal and regional rules and regulations.
The sealing for interstice gaps it is fundamental to prevent or reduce water infiltration that may lead to the cracking and falling of the unit. Failing to do this may lead to major injuries.
STACK BOND PATTERN

1/4 OFFSET BOND PATTERN

1/3 OFFSET BOND PATTERN

STEP 4
ENSURING A LEVELLED INSTALLATION
The first line of porcelain veneers will determine the levelness of each line above or underneath. To ensure that the porcelain veneers are installed straight use a chalk line: position the chalk line from side to side of the wall at a distance equal to the height of the porcelain veneer plus the desired grout spaces.
Check with the level that you have a straight horizontal line
and snap the chalk line. Decide in advance whether you
prefer to end up with partial porcelain veneers at the top or
at the bottom of the wall.
It is recommended to start the installation from a corner or
from the edge of the wall.
STEP 5
CHOOSING THE CORRECT MORTAR
Choosing the proper mortar is critical to ensure that
Landmark’s porcelain veneers do not come off and that
the bonding agent will not comprise the other essential
functions for an exterior coating system (soundproofing,
steam barrier, resistance to water, etc.).
For this reason, it is crucial to contact one of the mortar
manufacturing companies (Laticrete or Mapei to mention a
couple) to find out what solutions they might have available
(and consequently guarantees).
Between all the products suggested from the mortar
manufacturers for the bonding of the material, it is critical to
choose a product that is suited for porcelain tiles for
exterior application.
In some cases, the construction norms provide constrains, mandatory precautions and/or limitations on the bonding of construction materials (whether they are tiles, natural stones, manufactured stones, thin brick or other masonry product). Moreover, it is important to remember that the Building Code in the United States poses, for commercial use, a limit on the maximum dimension and weight for the glue bonding (without the assistance of mechanical hooks) of tiles, stone slabs or other materials used for exterior wall covering.
Because of this, it is important that the contractor verifies
upfront these constraints keeping in consideration the
characteristics of the building and its location.
In any case it is very important to contact the representative
of the company manufacturing the mortar up-front to verify
that the solution identified by reading the literature is
correct, keeping in mind:
• The type of wall that the user is trying to cover (how it is
made and what characteristics it presents);
• The type of material that the user wants to utilize
(porcelain in this particular case).
ATTENTION
When contacting the representative of the company
manufacturing the mortar, it is important to communicate
him or her the thickness, dimension and weight of every
piece of porcelain material to be installed (the information
is available in the Landmark Ceramic’s price list or can
be requested directly to Landmark). This way, the glue
representative can suggest the best bonding material
to the contractor/customer keeping in consideration the
characteristics of the material to be installed.
STEP 6
APPLYING LANDMARK’S PORCELAIN VENEER TO THE SURFACE
After the scratch coat mortar, if present, has cured sufficiently, dampen the wall before starting with the application. No residue of standing water should be left.
Note: Landmark’s porcelain veneer applications should be protected from temperature below 40°F during and immediately following the installation. The use of anti-freeze admixtures to lower the freezing point of the mortar is not recommended.
Spread a layer of mortar (above the scratch coat if present) on an area about 3 square feet to create the thinset. Use the notched trowel at a 45-degree angle to create an even ridged bed. Then, the porcelain veneer should be firmly pushed into the setting bed mortar, wiggling it a bit as you push to help it adhere. Mortar should be slightly weeping out from the entire perimeter of each piece after they are installed. Clean excess mortar off of surrounding joints during the installation process.
With the right mortar mix, moisture content and scratch coat preparation, the porcelain veneer will be stable within a few seconds of the setting movement process.
Continue to spread mortar and lay the porcelain veneers onto the rest of the wall in sections, checking with a level that each line of porcelain veneers is leveled. Place spacers between porcelain veneers to ensure even spacing. Tap each porcelain veneer with the mallet to firmly set them.
In exterior application, to guarantee even a more bonding of the unit to the surface, it is possible to back butter the Landmark’s porcelain veneer. The back-buttering process consists of covering the entire back, not only the perimeter, of the porcelain veneer with mortar using the flat-end of the trowel. This will ensure a proper adhesion of the porcelain veneer to the surface. Note that, since Landmark’ porcelain veneers are non-absorbent material, it is not necessary to wet the piece before the back-buttering process.
It is critical to verify, when creating the mortar bed and back buttering the unit that the mortar is spread evenly on the surfaces to prevent the creation of air bubbles and water infiltration that may lead to cracking.
Once all the porcelain veneers are lay down and the wall is covered let dry the wall for 24 hours.
STEP 7
GROUTING THE JOINTS
Once the wall is cured, grout the joints. It is critical to use an exterior-grade grout and mixing it according to the manufacturer instruction.
Use a grout float at a 45-degree angle to spread the grout over the wall. After the grout is dried, wipe the excess grout with a sponge.
FOCUS ON: STACKED STONE INSTALLATION (TIGHT FITTED ADHERED PORCELAIN VENEER APPLICATION)
In case of tight fitted adhered porcelain veneers application, always remember to Refer to recommendation included in
Step 5 for guidance regarding mortar selection. The back of the porcelain veneer and the scratch coat should be moistened
with the surfaces appearing damp but free of standing water.
The back of each porcelain veneer should be entirely buttered with mortar to a nominal thickness of 1/2 in. (13 mm).
Cover the entire back of the porcelain veneer, not just the perimeter. Buttered porcelain veneers should be firmly worked
onto the scratch coat and slid slightly back and forth to set the porcelain veneers.
Achieve mortar squeeze out in a volume that results in a full setting bed which covers the scratch coat completely.
As an alternative to the back-butter only method, mortar may be troweled onto the scratch coat, completely covering the
scratch coat. Or, both mortar application techniques may be combined. The resulting thickness of the scratch coat and
setting bed should be nominally 1 in. (25 mm) measured from the outer surface of the WRB (Water Resistive Barrier) to the
back surface of the unit. With the proper mortar mix, moisture content and scratch coat preparation, the installer will feel
the mortar start to grab within a few seconds of the setting movement process. At this point, no further movement of that
porcelain veneer should be made as the bond will be broken. If the porcelain veneer is inadvertently moved after initial set
has begun, it should be removed, mortar scraped off the back of the porcelain veneer and scratch coat, and then reinstalled
following the application process. Tight fitted porcelain veneers should be applied from the corners toward the middle of a
wall, and from the bottom toward the top of the wall.
CLEANING AFTER INSTALLATION
After grouting the joints, It is important to remove the excess grout with a sponge and clear water. After 12/48 hours, the grout in the joints will have “set up”/hardened significantly. There will be a noticeable residual “haze”. Typically, a diluted acid cleaner ideal for removing “Grout Haze”, combined with a soft scrubbing pad will remove the majority if not all the “Haze”.
Change your acid/water solution frequently for best results. It is also recommended to keep a bucket of clean water to remove the acid/water solution. It is recommended to keep and use clean dry towels to help remove as much residual water and keep the wall as dry as possible.
Please refer to the cleaning chemical company’s suggested methods and dilution rates. For areas with excess grout or grout that becomes adhered to the face of the porcelain veneer, further cleaning with an Acid/ Water Solution may be necessary.
Please refer to the Cleaning Chemical Company’s instructions as not all acids or chemicals are the same. The excess grout residue must be removed so that it does not dry and stick on the surface. It is necessary to change the cleaning water frequently and rinse well. If such cleaning procedure is not carried out, or if such cleaning is carried out too late, the grout residue could create an absorbent film, which holds dirt, making the surface difficult to clean: in this case, Landmark Ceramics will not be liable for any damage caused to the surface.
ORDINARY CLEANING
Ordinary maintenance must be carried out using specialized detergents to remove stains but these detergents must not leave a wax, film or membrane residue. Rinsing well with plenty of clean water is a fundamental part of the cleaning procedure, therefore we advise against the use of products which state that they “do not need rinsing”.