Porcelain PAVERS CUTTING
LINEAR CUT
The videos linked below show how to properly cut thick porcelain pavers (porcelain tiles with 20 mm thickness) currently used for outdoor installations. Cutting these porcelain thick pavers is very different than cutting standard thickness tiles. The extreme hardness of the material, combined with its thickness, are the main factors that will put cutting tools to the test.
Based on the experience of many professional tile installers, what often happens is that the basic blades make one or two good cuts on very thick tiles and then lose their cutting power. This causes the diamond blade to be so ruined that it can’t even be recovered with common abrasive stones. Many tile and brick installers have found a first solution for this: using segmented blades to cut these thicker tiles.
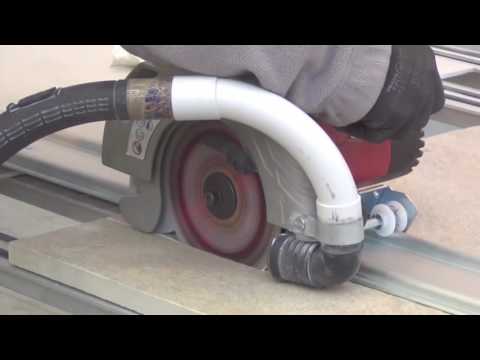
These are more aggressive blades that easily cut this type of ceramics leaving though a very poor cutting finish. There is then the need to spend time after each cut to finish the cut edge of the tile, especially if it is going to be laid in a position that leaves that edge visible after installation. It is important that the cut is made using a professional wet saw cutting machine and that is it made by pushing (or pulling, depending on how the cutting saw is built) the blade parallel to the plane from the beginning of the cut, applying a horizontal force (figure 1 and 2) to the trolley while avoiding to push (or pull) with excessive force.
Please note that the cut has to be performed at once with one passage. It is very important to pull down the blade without touching the tile and then pull/push the disc to cut the entire paver all at once.


It is not recommended (figure 3) to carry out the cut by applying a force perpendicular to the side of the cutting plane (basically pushing down the saw into the tile). In fact, performing a vertical cut could affect the internal tensions of the product and lead to tile breakage.
Another cutting method consists in making a groove about 2 / 3mm deep (figure 4) by applying a very light force perpendicular to the paver surface first and then making the final cut at once with one passage, as above reported in figure 1 and 2.
In both cases, it is always recommended to use high quality disc blades and to perform the revitalization operations of the latter whenever necessary to achieve a proper cut.
Landmark Ceramics recommends using a high quality blade specific for porcelain and revive it often. By using a low quality blade, or a blade not specifically made for porcelain, it might need to be revived 2 or even 3 times during the same cut. This can lead to extra costs related to the use of many diamond abrasive stones or, even worse, it can significantly increase the likelihood of breaking the paver during the cutting process.
During cutting, Landmark Ceramics always recommends the use of abundant water before, during, and after the cutting phases to minimize the presence or dispersion of ceramic powder and to cool down the blade.
Once the cut has been completed, Landmark Ceramics recommends to clean the newly cut surface with water, in order to remove all the dust from the
paver created by the cutting operation.
Please find below some links to videos of 20 mm porcelain pavers cutting:


DRILLING HOLES WITH CORE BITS
The creation of holes in traditional 9 / 10mm thick porcelain tile is a common practice, but it is very delicate and requires experience and technique.
This is even more true for 20mm thick porcelain paver, being this particular tile thicker and more resistant.
To carry out this specific cut, it is recommended to use drills or grinders together with high quality core bits for porcelain tile and paver. The use of low quality
core bits could cause numerous breakages, together with an extremely accelerated wear of the tool due to the resistance of the 20mm porcelain stoneware.
First of all, it is suggested to place the tile on a rigid support that absorbs the vibrations generated by the work (for example a panel of wood or
regenerated rubber on a wooden panel).
After positioning the drill with the core bit in the desired position (remember to check that the drill is not in hammer mode) it is crucial to mark the exact point with a pencil, then proceed to place the core bit by tilting it slightly on the paver (figure 5).
Do not place the core bit perpendicularly (figure 6) to the paver surface as it could lead to the breakage of the paver itself.
Once the core bit is in place and already moving, gently (and without pushing too much) make a continual and constant oscillatory movement until the
hole from top to bottom thorough the paver is complete (figure 5).
Landmark Ceramics recommendation is to use a high quality core bit specific for porcelain.
By using a low quality core bit, or a core bit not specific for porcelain, the likelihood of breaking the paver during drilling operation could increase.
During drilling, Landmark Ceramics always recommends the use of abundant water before, during, and after the drilling phase to minimize the presence
or dispersion of ceramic powder and to cool down the cutter.
Once the hole has been made, Landmark Ceramics recommends to clean the hole with water, in order to remove all the dust from the surface of the
paver created by the drilling.
It is also possible, whenever needed, to adjust the shape of the hole created with specific tools that soften the cut made by milling eventual sharp/
irregular edges of the hole.
These tools are always made with artificial diamonds and should be specific for porcelain tiles and pavers.


Watch a video of 20mm porcelain pavers drilling
GENERAL RECOMMENDATIONS
Landmark Ceramics recommends using high quality tools and blades, specifically designed for porcelain. This is because 20mm thick porcelain is very
strong and compact and does not behave, during cutting and drilling operations, like traditional thickness porcelain.
During cutting and/or drilling, Landmark Ceramics always recommends the use of abundant water before, during and after the drilling phases to minimize
the presence or dispersion of ceramic powder and to cool the blade/core bit.
Landmark Ceramics also recommends to use certified wet or suction tools to reduce and minimize the dispersion of ceramic powder.
Once the necessary operations are finished, it is very important to clean the surface of the tile from the dust to prevent it from being trapped by the filler
needed for the joints.
Landmark Ceramics always recommends the use of safety glasses, mask, gloves and steel toe shoes.