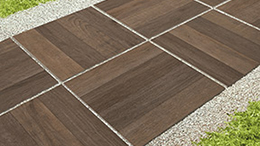
Porcelain Pavers installation
COMPLETE LAYING
VERSATILITY.

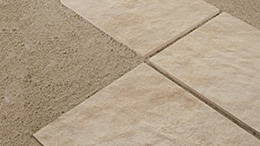
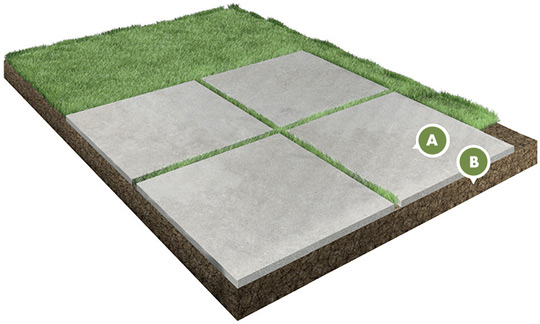
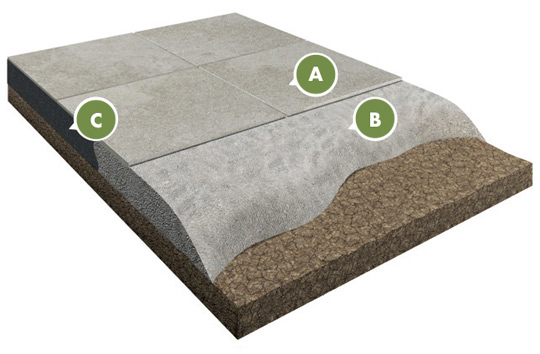
DRY LAYING.
A way of laying pavers that allows you to support plates directly onto grass, gravel or sand.
 .1 ON GRASS
.2 ON GRAVEL
.3 ON SAND

INSTALLATION OVER
REINFORCED CONCRETE*.
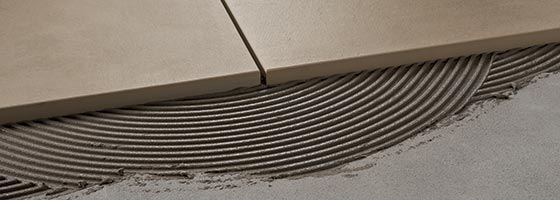
A way of laying pavers that allows you to create perfectly stable surfaces of incredible resistance.
* When installed over reinforced concrete (4” minimum) using a thinset/thickset mortar suitable for porcelain paver.

INSTALLATION
OVER DECKING.
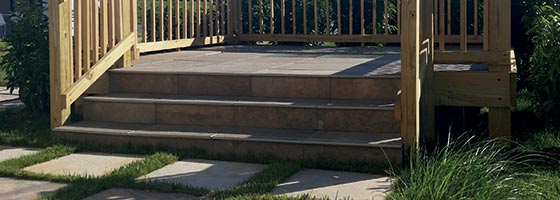
Traditional deck made with wood and porcelain pavers.

RAISED FLOORS.
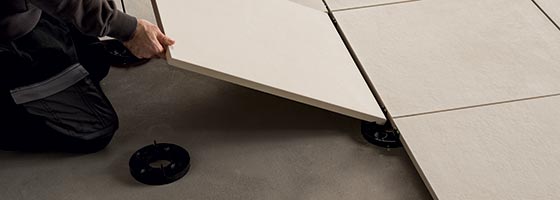
Slabs matched with a support structure for raised high-performing floors that also leaves sufficient room for under-floor inspection.
DRY LAYING.
ADVANTAGES.
- Rapid
- Modifiable
- Reusable
- Easy to carry through
- Reduces adhesives costs
- Quick to install
- Ready to use
LOCATIONS.
- Private gardens
- Patios
- Walkways
- Public parks and gardens
- Outdoor commercial areas
- Beach resorts
. 1 DRY LAYING
ON GRASS.

(Pedestrian foot traffic)
PRACTICAL INSTALLATION
Follow the drawing below.
- Cut grass in desired area as short as possible. remove any debris.
- Using a landscape rake scratch up top 1 inch of soil and level.
- Insure sub grade is graded to a 1” in 10’ slope and that it is pitched away from any building.
- AFRONTIER20 PORCELAIN ¾” NOMINAL (20MM) PAVERS
- BBARE SOIL IS BEST. SCRATCH AND LAYEL WITH A RAKE
ON COMPACTED ROAD BASE INSTALLATION
(Pedestrian foot traffic)
PRACTICAL INSTALLATION
Follow the drawing below.
- Compacted base road is composed of ¾ compated gravel.
- Sand bed course poured onto compacted gravel and screed to have smooth surface.
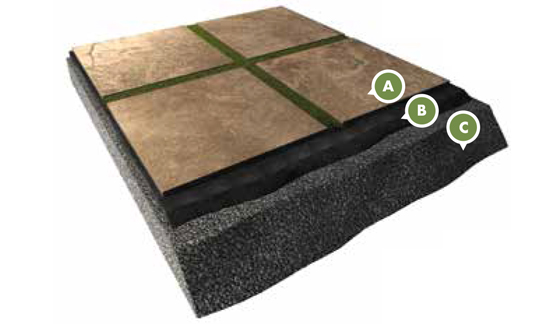
- AFRONTIER20 PORCELAIN ¾” NOMINAL (20 MM) PAVERS
- B1” SAND BEDDING COURSE SCREED WITH SMOOTH SURFACE
- CCOMPACTED ROAD
The stratigraphic images are just an example of the type of application and technical features of Frontier20.
Landmark Ceramics recommends to refer to the specific norms valid in the various countries to carry out a state-of-the-art installation.
. 2 DRY LAYING
ON GRAVEL.

(Pedestrian foot traffic)
PRACTICAL INSTALLATION
Follow the drawing below.
- The required edge restraint system for this installation has a vertical height of 2” (5 cm) as shown in the drawing.
- Insure that pavement is constructed with a 1” in 10’ and that it is pitched away from any building.
- Insure the 3/16” (4 mm) spacers are installed between all pavers, in order to prevent pavers from touching each other (and potentially chipping) and to allow better water drainage.
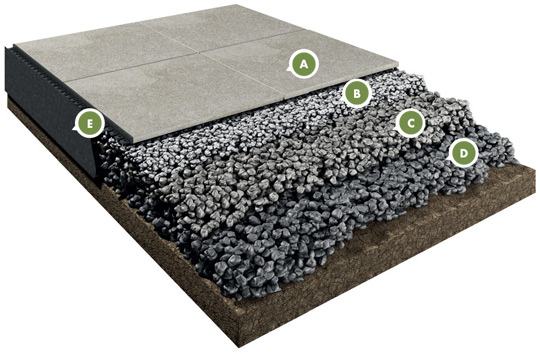
- AFRONTIER20 PORCELAIN ¾” NOMINAL (20 MM) PAVERS
- BCOARSENESS OF GRAVEL 2” - 8 S’ AND 9 S’ (1/2” + LESS)
- CCOARSENESS OF GRAVEL 4” - #57 (¾”)
- DCOARSENESS OF GRAVEL 6” - 3 S’- 4 S’ IF DESIRED
- EFILTER FABRIC
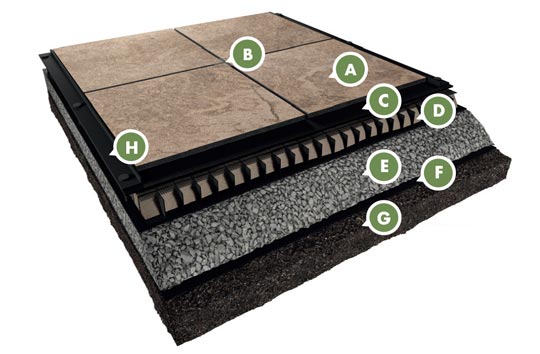
(Pedestrian foot traffic)
PRACTICAL INSTALLATION
Follow the drawing below.
- The edge restraint system is 0.75 “ - 1” height profi le;
- Attach the edge restraint into the panel;
- Lay fabric directly on top of the substrate to contain sand;
- Install panel onto sand bed course 1”;
- Insure the 3/16” (4 mm) spacers are installed between all pavers, in order to prevent pavers from touching each other (and potentially chipping) and to allow better water drainage.
- AFRONTIER20 PORCELAIN ¾” NOMINAL (20 MM) PAVERS
- BSPACERS
- CHIGH DENSITY PANELS
- DSAND 1/2” - 1”
- EFILTER FABRIC
- FF 1’ INCH PERIPHERAL ANCHOR
- GSUBSTRATE
WARNING:
Please remember that high density panel can reduce the heat dispersion accumulated by pavers exposed to direct sun or any other source of heat.
(Pedestrian foot traffic)
PRACTICAL INSTALLATION
Follow the drawing below.
- Paver joints have to be swept with polymeric tile sand;
- Please ensure that grate has to be fi lled with drainable sand;
- Depth of coarse aggregate has to be approximately 50% of traditional excavation vertical extent.
- AFRONTIER20 PORCELAIN ¾” NOMINAL (20 MM) PAVERS
- BSPACERS
- CFILTER FABRIC
- DGRATE SYSTEM FILLED WITH DRAINABLE SAND
- ECOARSE AGGREGATE (67 OR 57)
- F1’ INCH PERIPHERAL ANCHOR
- GADDITIONAL FILTER FABRIC IF NEEDED
- HSUBSTRATE
Insure the plastic 3/16” (4 mm) spacers are installed at all corners of the installed pavers, in order to prevent pavers from touching each other (and potentially chipping) and to allow better water drainage.
The stratigraphic images are just an example of the type of application and technical features of Frontier20. Landmark Ceramics recommends to refer to the specific norms valid in the various countries to carry out a state-of-the-art installation.
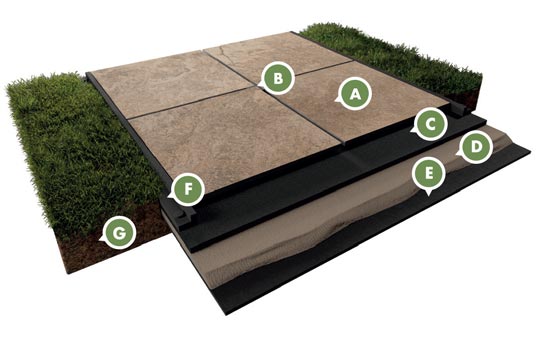
. 3 DRY LAYING
ON SAND.

(Pedestrian foot traffic)
PRACTICAL INSTALLATION
Follow the drawing below.
- Base material is to be over dug 6” to 8” beyond the edge of the pavement;
- The required edge restraint system is a low profi le edge restraint with a vertical height of 1.5”” (4 cm) as shown in the drawing;
- Insure that pavement is constructed with a 1” in 10’ slope that it is pitched away from any building;
- Insure the plastic 3/16” (4 mm) spacers are installed at all corners of the installed pavers, in order to prevent pavers from touching each other (and potentially chipping) and to allow better water drainage.

- AFRONTIER20 PORCELAIN ¾” NOMINAL (20 MM) PAVERS
- B¾” UNCOMPACTED BEDDING SAND
- C4-6” CRUSHER RUN/ROAD BASE
- DFILTER FABRIC
(Pedestrian foot traffic)
PRACTICAL INSTALLATION
Follow the drawing below.
- Filter fabric is recommended as it allows water to pass but not the particles of sand;
- 2-4” of a compactable sand is recommended. You can go with more however it will not offer any distinct advantage. Going with less than 2” may offer a less desirable effect as it will tend to hold more water and become “mushy” when super saturated;
- The use of an edge restraint is ideal but not necessary. It becomes more necessary if your desired paving area is above the surrounding native soil, as it will help aid in the minimization of sand migration or erosion;
- Insure the plastic 3/16” (4 mm) spacers are installed at all corners of the installed pavers, in order to prevent pavers from touching each other (and potentially chipping) and to allow better water drainage.
- AFRONTIER20 PORCELAIN ¾” NOMINAL (20 MM) PAVERS
- BAPPROX. 4” OF BEDDING SAND
- CFILTER FABRIC
(Pedestrian foot traffic)
PRACTICAL INSTALLATION
Follow the drawing below.
- The edge restraint system is 1 ½” - 2” height profi le;
- Ensure edge restraint into the concrete base made;
- Lay fabric directly on top of the concrete to contain sand and fold it up the front of the edging.;
- Insure that pavement is constructed with a 1” in 10’ and that it is pitched away from any building;
- Insure the 3/16” (4 mm) spacers are installed between all pavers, in order to prevent pavers from touching each other (and potentially chipping) and to allow better water drainage.
- AFRONTIER20 PORCELAIN ¾” NOMINAL (20 MM) PAVERS
- BSAND BEDDING COURSE 1”
- CFABRIC
- DEXISTING OR NEW CONCRETE 4” MINIMUM
- E1/2” 1” INCH DRAINAGE HOLES DRILLED 24 INCH ON CENTER
- FPERIPHERAL RESTRAINT SYSTEM
Insure the plastic 3/16” (4 mm) spacers are installed at all corners of the installed pavers, in order to prevent pavers from touching each other (and potentially chipping) and to allow better water drainage.
The stratigraphic images are just an example of the type of application and technical features of Frontier20. Landmark Ceramics recommends to refer to the specific norms valid in the various countries to carry out a state-of-the-art installation.
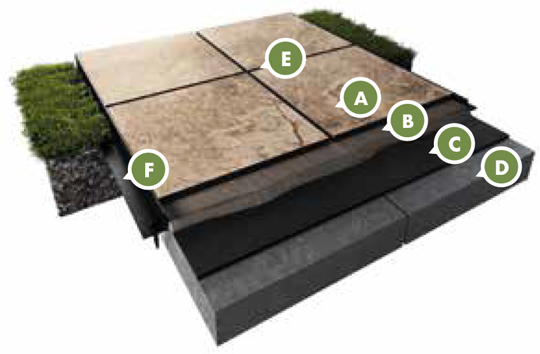
INSTALLATION
OVER REINFORCED
CONCRETE *.
This method offers the most stable and most durable fl oor covering that is able to withstand foot traffic up to light vehicular traffic.
* It is recommended installation over 4” minimum thick reinforced concrete, using a thinset/thickset mortar suitable for porcelain paver.

ADVANTAGES.
- LONG TERM DURABILITY
- READILY ACCESSIBLE SURFACES
- ABLE TO WITHSTAND PEDESTRIAN AND LIGHT VEHICLURE TRAFFIC
LOCATIONS.
- Yards
- Porches
- Terraces
- Ramps
- Garages
- Parking areas
- Cycle tracks
- Pavements
- Squares
THIN SET MORTAR APPLICATION OVER REINFORCED CONCRETE
PRACTICAL INSTALLATION
Follow the drawing below.
- Insure that pavement is constructed with approximately 2 degree slope and that it is sloped away from any building.
- Please consult your paver supply distributor for thin set mortar suitable for porcelain paver as well as for inside or external usage.
- For cementitious adhesive and grout installation, refer to the manufacturer’s technical instructions and specifically as they relate to outdoor installations.
- For concrete foundation slabs that are not large enough to require contraction/control joints, a minimum 3/16” (4 mm) grout joint is acceptable, but for larger concrete foundation slabs that do require contraction/control joints, the control joint width should be a 3/8” (1 cm). It is absolutely imperative that all contraction/control joints be located in the joint line of installed porcelain pavers and not beneath a paver.
CAUTION: if a porcelain paver is installed over a control joint, the paver will refl ectively crack along the contraction/control joint beneath it.
Utilization of an uncoupling membrane can help minimize the potential issue.
- AFRONTIER20 PORCELAIN ¾” NOMINAL (20MM) PAVERS
- BTHINSET
- C3/16” MINIMUM GROUT JOINT
- DUNCOUPLING MEMBRANE
- EEXISTING OR NEW CONCRETE (REINFORCED). 4” MINIMUM
The stratigraphic images are just an example of the type of application and technical features of Frontier20. Landmark Ceramics recommends to refer to the specific norms valid in the various countries to carry out a state-of-the-art installation.
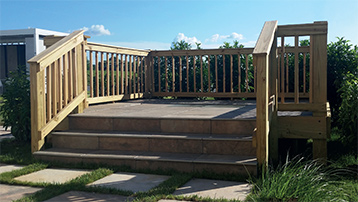
INSTALLATION
OVER DECKING.
ADVANTAGES.
- Antislip frost resistant
- Resistant to thermal shock
- Safety
- Easy to maintain
- Durable over time
- High end look
- Never having to stain deck boards again
- No screw or nails sticking up
- No wood splinters
LOCATIONS.
- Private gardens
- Outdoor elevated walkways
- Deck patios
- Deck gazebos
(Pedestrian foot traffic)
PRACTICAL INSTALLATION
Follow the drawing below.
- Deck joists must be “sound” and in good condition as well as constructed in accordance with local codes;
- Deck joists must be spaced 16” on center;
- Top of joists bust be fl at to one another;
- Grates will span 2 joists and be fastened using weather proof screws;
- Stagger grates 1/3 rd, ¼th or ½ as shown;
- Outdoor fabrics varies in thickness. Multiple layers may be needed to reduce acoustics;
- The use of porcelain paver spacers are recommended. 1/8 th inch joints are the minimum recommendation;
- Silicon or a neutral colored adhesive may be applied to spacers to help reduce porcelain paver movement;
- Porcelain paver joints may be fi lled or left open, depending on desired drainage;
- Insure the 3/16” (4 mm) spacers are installed between all pavers, in order to prevent pavers from touching each other (and potentially chipping) and to allow better water drainage.
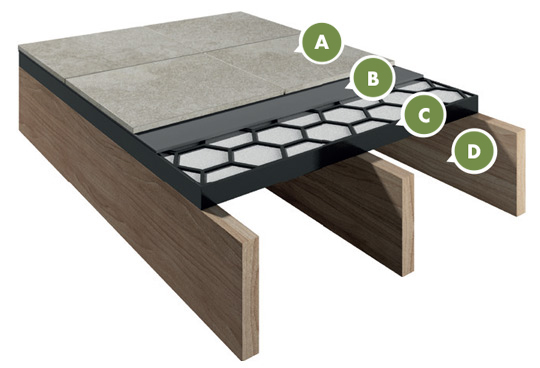
- AFRONTIER20 PORCELAIN ¾” NOMINAL (20MM) PAVERS
- BOUTDOOR FABRIC OR SOUND DAMPERING MATTRESS
- CHONEYCOMB PLASTIC GRATE
- DDECK JOISTS
Insure the plastic 3/16” (4 mm) spacers are installed at all corners of the installed pavers, in order to prevent pavers from touching each other (and potentially chipping) and to allow better water drainage.
The stratigraphic images are just an example of the type of application and technical features of Frontier20. Landmark Ceramics recommends to refer to the specific norms valid in the various countries to carry out a state-of-the-art installation.
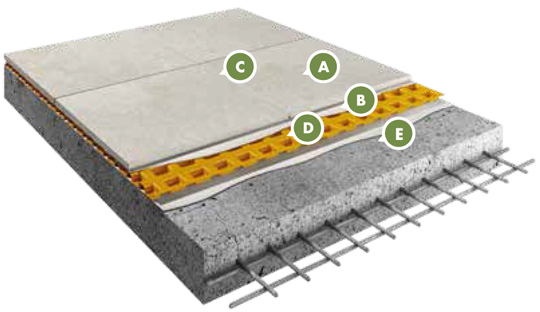
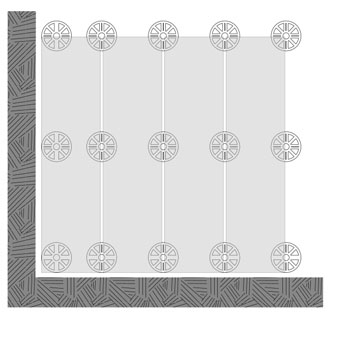
RAISED
FLOORS.
The raised flooring system is easy to manage, allows you to configure the underlying wiring or plumbing systems based on specific needs and also to change its configuration any time a new look is needed.


ADVANTAGES.
- Level off uneven surfaces
- Allows you to hide unsightly pipes and plants wires and electrical conduit
- Easy maintenance
- Allows for water drainage
- Resistant to thermal expansion
- Provides thermal and acoustic insulation
- No need for adhesives
- Reduces labour costs
LOCATIONS.
- Patios
- Gazebos
- Facility areas of commercial venues
- Roof tops
(Pedestrian foot traffic)
PRACTICAL INSTALLATION
Follow the drawing below.
- Ensure concrete slab is in stable condition and has a 1” in 10’ slope to divert water away from structure;
- Ensure spacer tabs are intact in the corners where the porcelain pavers might come to contact;
- AFRONTIER20 PORCELAIN ¾” B NOMINAL (20 MM) PAVERS
- BPEDESTAL
- CEXISTING SLAB OR SUBSTRAIGHT
(Pedestrian foot traffic)
PRACTICAL INSTALLATION
Follow the drawing below.
- Make sure the concrete slab is properly built and smooth and has 1 ½ - 2 degree pitch and that it is pitched away from any building;
- Plastic ¾” pedestal support must be placed and installed all corners of the pavers.

- AFRONTIER20 PORCELAIN ¾” NOMINAL (20 MM) PAVERS
- BPEDESTAL
- CCONCRETE BASE
- DSUBGRADE
Insure the plastic 3/16” (4 mm) spacers are installed at all corners of the installed pavers, in order to prevent pavers from touching each other (and potentially chipping) and to allow better water drainage.
The stratigraphic images are just an example of the type of application and technical features of Frontier20. Landmark Ceramics recommends to refer to the specific norms valid in the various countries to carry out a state-of-the-art installation.
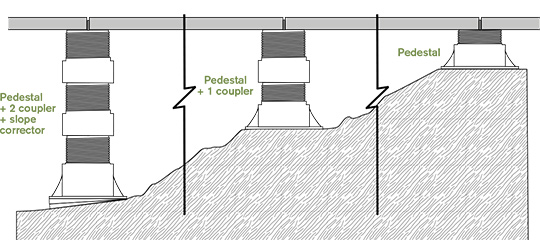
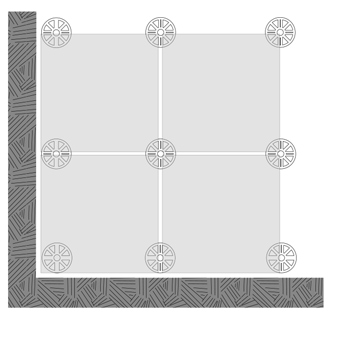
RAISED FLOORS
INSTALLATION SYSTEM.
LOW HEIGHT SUPPORTS.
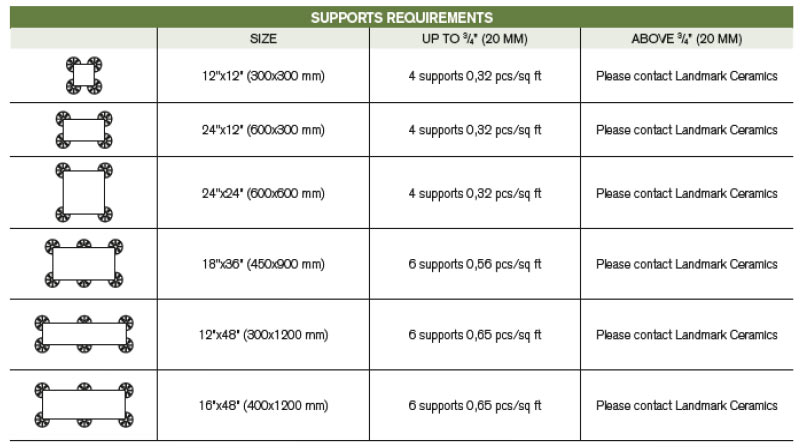
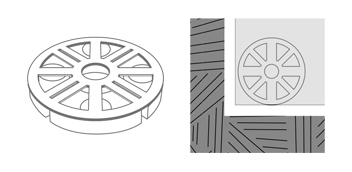
System made up of disks of variable thickness. Utilize for low height installation (up to ¾”).
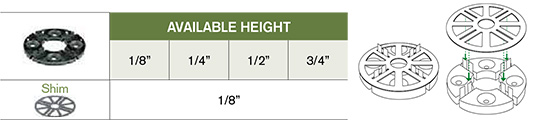
ADJUSTABLE HEIGHT SUPPORTS.
System made up of adjustable height pedestal (from 1 ¼” to 16”).
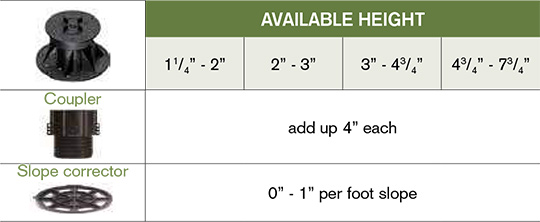
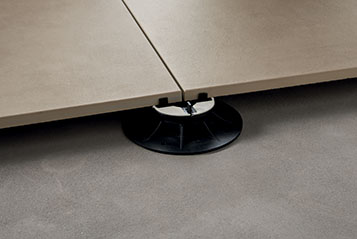
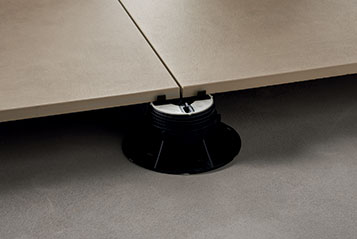
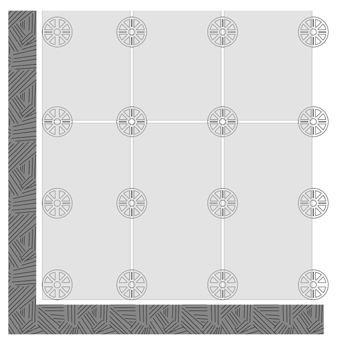
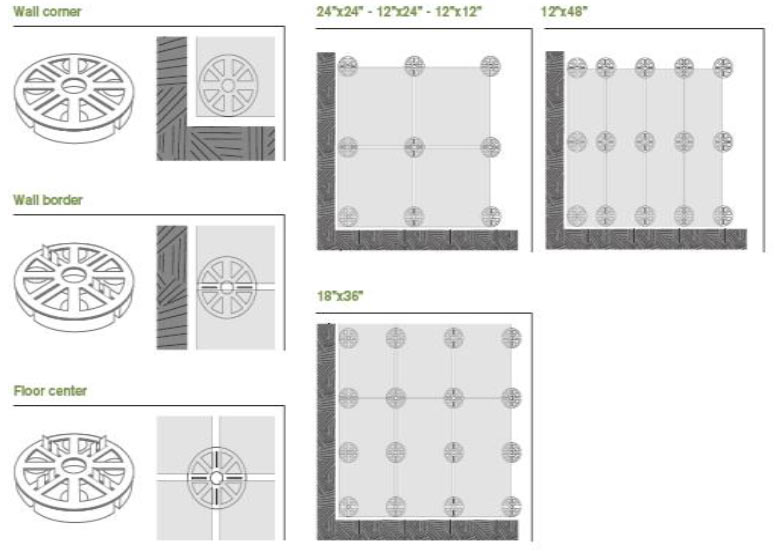
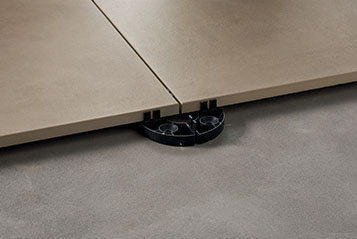
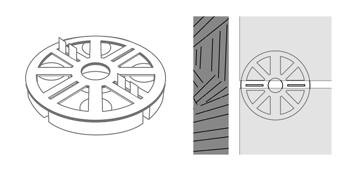
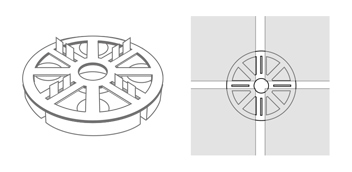
Support come equipped with four spacers that allow for the creation of grout lines between pavers. For a correct installation against walls or corners, it is necessary to keep the supports distant from the wall and remove 2 or 4 spacers as showed in the picture. Landmark Ceramics recommends to strictly follow the instructions for the raised installation of Frontier20.
Wall corner
Wall border
Floor center
24”x24” - 12”x24” - 12”x12”
12”x48”
18”x36”