Can porcelain pavers be installed over gravel?
Some of the most frequently asked questions from our customers are: which solution should I choose for my patio? Can porcelain pavers be installed over gravel? What are the advantages of dry laying?

If you are designing your new outdoor area and you are wondering whether porcelain pavers can be installed over gravel, you are in the right place as here you will find everything you should know about the porcelain pavers installation.
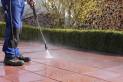
Porcelain pavers are an extremely strong and durable material, but also waterproof, fade and stain resistant and able to withstand thermal shock. For all these reasons, porcelain pavers can be the perfect choice for a versatile, stylish, safe and easy to maintain outdoor environment.
Can porcelain pavers be installed over gravel?
Dry laying is a type of installation that allows the tile to be applied directly to the ground without the use of screed, mortar or glue. Choosing this type of installation will allow you to work quickly and easily and to remove the porcelain pavers in the easiest way if necessary. In addition, dry laying has the important advantage of draining water while maintaining the substrate intact. But let's see in detail the common types of dry laying installations and answer the question: can porcelain pavers be installed over gravel?
Dry laying allows porcelain pavers to be laid directly on grass and sand, but also on gravel, thanks to their reduced thickness of 20 millimeters that avoids the use of adhesives. Speed and simplicity are the key words, and the main advantages of using this technique including low costs, as the material is easier to transport and there is no need to buy adhesive materials, the layout can be modified over time, and the use of ready-to-use pavers that can be reused in the future. The simplicity and speed of dry laying on gravel means that pavers can be freely installed, removed and repositioned at any time, allowing for maximum creativity in configuration and flexibility in subsequent modification. These procedures do not require the intervention of specialized personnel and allow installation even where it is not possible to build or lay permanent pavements. Finally, rapid water drainage and a striking aesthetic result, with an elegant range imitating the appearance of natural stone, concrete, wood, marble, etc. make the installation of porcelain pavers over gravel a perfect choice for all circumstances.
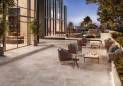
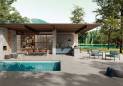
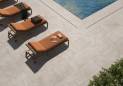
"But where can porcelain pavers be installed over gravel?" - Laying on gravel is ideal where it is not possible to build or for permanent paving. Used for pedestrian traffic, dry laying on gravel is a practical and versatile solution, with a contemporary aesthetic that enhances private gardens and patios, walkways and driveways, panoramic terraces, walkways for bathing establishments, fairs and events in outdoor shopping areas, gazebos, perimeter areas in private swimming pools, parks and public gardens.
Can porcelain pavers be installed over gravel? Our advices
- To begin with, define the area to be excavated, mark the perimeter and provide an edging or retaining element to ensure a good seal;
- Remove part of the thickness of the soil, which should be evaluated according to the type of soil and its drainage capacity, its general condition and the expected load;
- Level the bottom with the help of a rake, a ruler and a spirit level;
- Place a layer of fabric on the bottom to block vegetation and to prevent the soil from mixing with the gravel;
- Lay a layer of mixed-grain gravel (8 to 12 inches thick) to allow rainwater to run off, then another layer of gravel 4 to 8 inches thick;
- Use a steel or wooden board to compact both layers and level them, always taking care to maintain the proper slope;
- Lay the tiles according to the layout you want, checking the alignment of the joints every 5 meters of laying progress;
- Tap the resulting floor carefully with a rubber mallet to consolidate it and to achieve good flatness;
- Make sure that all the tiles are stable and level with each other and with the gravel layer, to avoid shifting of the slab or damage due to side impact.